Backbone.js Makes Building JavaScript Applications Fun
Like many developers I’ve had a long, complicated relationship with Javascript. Especially with libraries like jquery it’s incredibly easy to add interesting behavior to your pages, but unless you’re very careful its also likely that you’ll end up with a mess of spaghetti javascript. I know as I’ve gotten myself into that mess and abandoned many projects because they were just too hard to change. All this has changed with some of new libraries out there that help you write your javascript following the MVC pattern.
Today I’m going to talk about backbone.js and show how it helped me and two friends build a rich one-page application to understand an exception stack trace. Backbone.js describes itself as supplying structure to JavaScript-heavy applications by providing models with key-value binding and custom events, collections with a rich API of enumerable functions, views with declarative event handling, and connects it all to your existing application over a RESTful JSON interface.
There are a number of tutorials and examples available out there to get you started. The basic idea is to uses backbone.js to organize your code into models, views and controllers.
What is CodeBuddy
CodeBuddy is the application I’ll describe. It helps you navigate an exception stack raised by your Rails app or any other stack you paste in. I worked on it with Pat Shaughnessy and Daniel Higginbotham and Pat produced a super article describing what CodeBuddy is and how to use it.
There is some server-side code that replaces the Rails Show Exceptions page and syntax highlights a snippet of source code for each line in the stack but for this article I’m going to ignore that and focus on the interactive page and the javascript behind it.
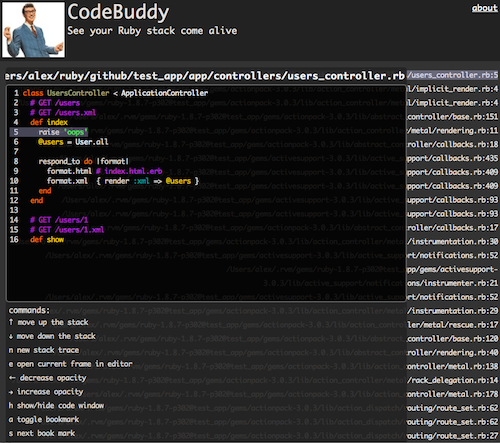
Below is a picture showing a stack trace the background and the code snippet for the currently selected line in front.
Now a picture is okay but to really get a sense of it I suggest you follow this link to
experience Code Buddy in action
- try pressing ↑ or ↓ or double clicking a few lines in the stack then press s.
There’s a lot going on here and if we had tried building this before discovering backbone.js we probably would have had created a mess - mixing javascript and html that quickly would have become hard to change. I’m going to show you how backbone let us separate the models from the views and create something that was not hard to grow.
Let’s get into the technical details!
Organizing our data in Backbone Models
We want to follow good OO design principles and thinking about this our exception stack is really just a few objects:
- A
Stack- has many
Addresses - knows which
Addressis selected
- has many
- Each
Addresshas- path to a file
- line number
- snippet of code
We can build this as a JSON object like
var stackJson = {
  "stack_frames": [
    { "path": "/Users/alex/ruby/github/test_app/app/controllers/users_controller.rb",
      "line": 5,
      "code": "class UsersController < ApplicationController\n..."
    },
    { "path": "/Users/alex/.rvm/.../lib/action_controller/metal/implicit_render.rb",
      "line": 4,
      "code": "module ActionController\n..."
    }
  ],
  "selected": 0
}
The first step is to turn this into backbone models.
// Stack, Address and Addresses
CodeBuddy.backbone.Stack = Backbone.Model.extend({
  initialize: function() {
    this.set({
      addresses: new CodeBuddy.backbone.Addresses(this.get('stack_frames'))
    })
  }
})

CodeBuddy.backbone.Address = Backbone.Model.extend({
})

CodeBuddy.backbone.Addresses = Backbone.Collection.extend({
  model:CodeBuddy.backbone.Address
})
The way we build a model in backbone is by extending Backbone.Model. When extending we can add custom behavior
if we want. In our example we tell the Stack to contain a collection of Address objects in the Addresses collection.
We use the backbone collection framework to define Addresses and tell it that it is a collection of Address model objects.
These models will use the default backbone behavior for the rest which includes read/write access to its properties get or set.
Now that they’re defined, we’re ready to interact with these models. For example below is what you’d see using the Chrome javascript console (I’m showing the output as comments for readability)
// Using our models in a console
CodeBuddy.stack = new CodeBuddy.backbone.Stack({
  "stack_frames": [
    { "path": "/Users/alex/ruby/github/test_app/app/controllers/users_controller.rb",
      "line": 5,
      "code": "class UsersController < ApplicationController\n..."
    },
    { "path": "/Users/alex/.rvm/.../lib/action_controller/metal/implicit_render.rb",
      "line": 4,
      "code": "module ActionController\n..."
    }
  ],
  "selected": 0
})
// inherits.child

CodeBuddy.stack.get('addresses')
// inherits.child

CodeBuddy.stack.get('addresses').first().get('path')
// "/Users/alex/ruby/github/test_app/app/controllers/users_controller.rb"

CodeBuddy.stack.get('addresses').first().get('code')
// "class UsersController < ApplicationController
// ..."
We now have an object hierarchy with default behavior which we can (and will) extend in a bit but first let’s build some views and get a page we can look at.
Building the UI with Backbone Views
We’re going to build
- A
StackViewthat contains manyAddressViews - Each
AddressViewwill display a single line from the stack. - Each view will be tied to one of our model objects
It will look something like this:
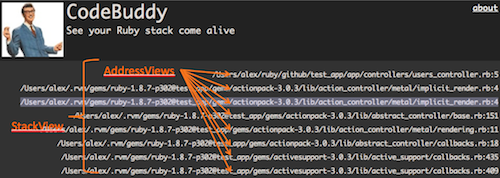
We can start with a StackView that’s tied to the Stack model.
Creating a backbone view is very similar to how we created our models - we extend Backbone.View and can
override behavior if we want.
CodeBuddy.backbone.StackView = Backbone.View.extend({

  el: $("#stack"),

  initialize: function() {
    this.model.get('addresses').each(this.addOneAddress);
  },

  addOneAddress: function(address, index) {
    var view = new CodeBuddy.backbone.AddressView({model: address});
    this.$("#stack").append(view.render().el);
  }
})
In this case we overrode the initializer function to create an AddressView for each address.
It also uses jQuery to add the AddressView's html within the page’s #stack element.
To do the iteration we use another powerful javascript library called
underscore.js. Underscore.js gives us a ruby-like collection methods letting us
write .each(this.addOneAddress). This will iterate over all the addressses calling the addOneAddress function on each one.
Underscore.js also gives us erb-like templating we’ll use in the AddressView…let’s take a look at that view.
CodeBuddy.backbone.AddressView = Backbone.View.extend({
  tagName:  "li",

  template: _.template("<span class='container'><%= path %>:<%= line%></span>"),

  initialize: function() {
  },

  render: function() {
    var html = this.template(this.model.toJSON())
    $(this.el).html(html);
    return this;
  }
})
You can see the template and how it does look like erb. It defines the html that will be displayed for each address and its able to access
properties in the model like path and line. The template gets applied in the render function with the line this.template(this.model.toJSON()).
Finally, tagName is used to wrap this html in an li tag.
Now we can put it all together to see on a page. We can start with a toplevel page that has an element with stack, includes our models and views and tells them to load.
<html>
<body>
<ul id="stack"></ul>
<script src="javascripts/code_buddy.js" type="text/javascript"></script>
<script>
CodeBuddy.setup({
"stack_frames": [
{ "path": "/Users/alex/ruby/github/test_app/app/controllers/users_controller.rb",
"line": 5,
"code": "class UsersController < ApplicationController\n..."
},
{ "path": "/Users/alex/.rvm/.../lib/action_controller/metal/implicit_render.rb",
"line": 4,
"code": "module ActionController\n..."
}
],
"selected": 0
})
</script>
</body>
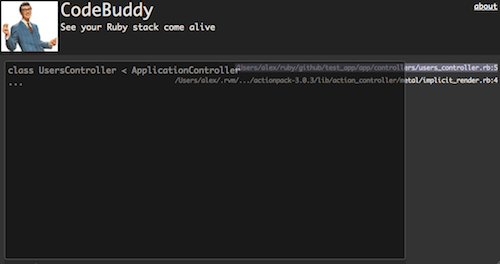
</html>After the page loads and the views render it changes the #stack div to have all this
<ul id="stack">
  <li>
    <span class="container">/Users/alex/ruby/github/test_app/app/controllers/users_controller.rb:5</span>
  </li>
  <li>
    <span class="container">/Users/alex/.rvm/.../lib/action_controller/metal/implicit_render.rb:4</span>
  </li>
</ul>
So far this is a lot of framework and structure for a simple page but now is when it gets interesting and backbone reveals its true power!
Showing code for the selected address
Let’s say we want to mark one address selected and show the code for that one.
We can start by adding an element to the html called code-viewer
<html>
<body>
  <ul id="stack"></ul>
  <div id="code-viewer">
    <div id="code"></div>
  </div>
  <!-- all the javascript omitted for clarity -->
</body>
</html>
Now we want to create a StackView to put the right code in there
CodeBuddy.backbone.CodeView = Backbone.View.extend({
  el:$("#code-viewer"),

  initialize: function() {
  },

  render: function() {
    this.$("#code").html(CodeBuddy.stack.selectedAddress().get('code'))
  }
})
In this view we used our models to find which address was selected CodeBuddy.stack.selectedAddress() so let’s add that method.
CodeBuddy.backbone.Stack = Backbone.Model.extend({
  initialize: function() {
    // same code as before
  },

  addresses: function() {
    return this.get('addresses')
  },

  selectedAddress: function() {
    var selected = this.get('selected')
    return this.addresses().at(selected)
  }
})
That’s it, now we have a code view on top of the stack view and our code is still clean and well organized. I’m not afraid to keep going and make our next change.
Changing the selected address
Oh, we just got a new requirement to be able to scroll up and down through the stack and see the code window change as we go.
We add some more functions to our Stack Model so we can change the selection and we also tell it to call the selectionChanged function whenever
the selected property changes.
Calling a function on a property change is something that’s given to us with backbone events.
Getting the view to update itself is also easy we just tell it to with CodeBuddy.codeView.render()
CodeBuddy.backbone.Stack = Backbone.Model.extend({
  initialize: function() {
    this.bind('change:selected', this.selectionChanged);
    // same code as before
  },

  setSelection: function(newSelected) {
    if (newSelected >= 0 && newSelected < this.addresses().size()) {
      this.set({ selected: newSelected })
    }
  },

  selectPrevious: function() {
    this.setSelection(this.get('selected') - 1)
  },

  selectNext: function() {
    this.setSelection(this.get('selected') + 1)
  },

  selectionChanged: function(x) {
    this.addresses().at(x.previousAttributes().selected).view.render()
    this.addresses().at(x.changedAttributes().selected).view.render()
    CodeBuddy.codeView.render()
  },

  // all the existing functions remain
})
The last thing we need to do is give some way for the user to change the selection. We decided to use jQuery Hotkeys to bind to the up and down arrows (↑ or ↓).
CodeBuddy.setStackKeyBindings = function(){
  $(document).bind('keydown', 'up',   CodeBuddy.stack.selectPrevious)
  $(document).bind('keydown', 'down', CodeBuddy.stack.selectNext)
}
Conclusion
I hope this example has shown a little of the power of using backbone.js when you need to write a complex javascript application.
If you want to see the actual application its all on Github in
code_buddy.js
This was our first project working with backbone.js and I’m sure there’s much more we can learn but we’ve found that it lets us write modular code with many small methods which feels much closer to writing Ruby than my previous forays into javascript.
Backbone.js makes writing a javascript application fun!